Before You Shoot
Once you have found the image that you want to go with, you need to figure out how your going to fit into the image. This is important. We're going to partner up and have someone take a picture of you for this assignment. They need to know the angle that you have to be shot at (are they looking down at you, shooting you at an angle, etc.) to fit into the photo correctly. With that considered and discussed, your ready to take a picture. Before we do that, take a look at the PowerPoint below and then the short video on using a camera. Just remember that these are expensive cameras, and you're responsible for the camera when you are using it!
https://www.youtube.com/watch?v=5UdKHifycs8
Ok, so take your picture! After you take one of your partner, have them take one of you. Don't be afraid to snap a couple of extra shots from different angles, with different expressions... choice is a good thing! Better to have more to choose from than not enough.
Importing & Opening
|
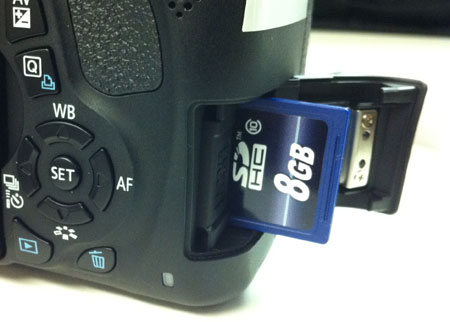
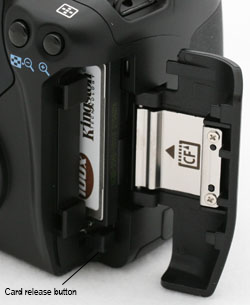
Ok. You have taken some pictures and are ready to get them into the computer. This is the easy part. Find the card door on the camera and open it. If you are using cameras 2-5, you can just slide the door open and push in on the card. This will eject the card from the camera. If you are using camera 1, there's just one extra step. After you open the door, you'll have to push a little black button to get the card to eject.
When you take the card out, don't touch the copper strips on the card. Touching these contacts will eventually break down the contacts and make the card burn out faster than usual. Ok, now you can simply insert the card into your computers card reader. If you were using cameras 2-5, you can just use the slot on the card reader labeled SD. DON'T force the card! If you force it, you could break it! If it doesn't want to go, you may be trying to put it in upside down. If you are using camera 1, there is an external card reader and usb cable that you will need to use to transfer the pictures. Just plug the cable into the card reader and the other end into a usb port and put your card into the CF slot. Now you can launch Photoshop. There may be two icons on the novel screen for Photoshop. If one doesn't work, use the other one. When Photoshop opens, simply choose file open and find the memory cad (it's probably labeled removable disc), look through the folders and find your picture. When you have found it, click open. Take a look at your picture. Are you happy with it? It may be a little soft or blurry. It's sometimes hard to notice this on the tiny LCD screen of a camera, but when you get to the computer, it's much more obvious. If you aren't happy with the shot, re-shoot it. If you are happy, just choose File>Save As and save the picture to your ID# on the server. If you have a thumb drive, great! Use it instead. Name your photo and click save. |
|
Moving Photos From Your Phone to Drive
If you are taking this class through the BCA, you may be shooting on a phone. If this is the case, you have a different process to go through. Many students and adults even think that the best way to move photos is by emailing them to yourself. You do not want to do this! Email will compress the photo throwing out some of the pixels to make the file smaller. In other words, emailing it will sacrifice quality. Instead we will move them to Google Drive. This process is different on iOS and Android so check out the information for your specific type of phone.
iOS Users
If you are using an updated version of iOS you may need to change camera to shoot in JPEG instead of Apple's own file type. So if you are going to shoot new pics, follow the steps on the second video first. You can always search for a website to convert your HEIC files afterward, but changing this first will save you some work.
Now as an iOS user, the process of moving the images is a little different from android users. Check out the video below.
Android Users
Since Android already comes with Drive and you should have an account already linked it will be easy for you move your photos. The video below will explain the process.
Downloading Photos
Making a Selection
With your images now saved to your ID# on the server, it's time to practice making a selection. Go out to the web and find a picture to practice on. Any picture (as long as it's school appropriate!) will do. With that image, we are going to pick one item to select from the photo. There are several tools that we can use to make a selection, and we're going to practice with all of them. So find an image to practice on and watch this video. After watching the video, give the tools a try on your practice image.
https://www.youtube.com/watch?v=F_BDZjAIPWs
After you have practiced with all of the tools and feel like your pretty comfortable with them, you can open up the picture of you that you imported to the camera and begin making a section of you. Take your time though! Your final picture is only going to look as realistic and legit as the selection that you have made. Don't be afraid to really zoom in close (remember that ctrl + will zoom you in and ctrl - will zoom you out) so that you can closely examine the edge and make sure that it is solid.
