NHS Intro to Digital Photography
  • Home
  • Curriculum
    • Lessons & Powerpoints >
      • Intro to Digital Photography Lesson
      • ImageTransfer & Workflow >
        • Bridge
        • Importing & Proofing
      • Copyright
      • Point and Shoots vs. SLR Cameras
      • File Formats & Aspect Ratio
      • Looking vs. Seeing
      • Buying a Digital Camera
      • Getting to know Your Digital Camera
      • Exposure Basics
      • Exposure Compensatrion >
        • Spot Exposure Corrections
        • Global Exposure Corrections
      • Output - Resizing
      • Shooting Modes
      • White Balance >
        • Adjusting White Balance
      • Cropping
    • Merging Assignment >
      • Some Background
      • Resolution & Finding Images
      • Before You Shoot
      • Using the Camera
      • Importing & Opening Photos
      • Moving Photos From Your Phone
      • Making a Selection
      • Making a Selection become a Cutout
      • Adjusting Color Temperature
      • Merging the Images
      • Resizing an Image
    • Color for Emphasis >
      • Importing & Downloading from Drive
      • Photoshopping the Project
    • Logo Design >
      • Practice Vector
      • Ill Dog
      • Making Thumbnails
      • Digitizing the Rough
      • Setting up to Vector
      • Layering and Planning a Vector
      • Vectoring Problems and Corrections
      • Quick Vector Image Touchups
      • Rasters vs. Vectors
    • Beauty Touchups >
      • Clone Stamp
      • Dark Circles
      • Smart Blur
      • Smart Cast
      • Liquify
      • Sharpening
      • Making a Vignette
      • Red Eye
    • Antiqued Photo >
      • Antiqued Photo Part 1
      • Antiqued Photo Part 2
      • Making a Wallpaper In Illustrator
      • Antiqued Photo Part 3
      • Antiqued Photo Part 4
    • Film Strip Collage >
      • Cropping
      • Film Strip Collage Construction
    • Folded Card
    • Lens Blur (for Depth of Field)
    • Straightening a Crooked Photo
    • Blur Overlay Layer
    • Calendar >
      • Calendar Collage
      • Cropping to Fit the Calendar
      • Giving Your Calendar Depth
      • Lens Flare Background
      • Proofing, Exporting & Turning In
      • Proofing the Calendar as a PNG
    • Weekend's Photo Assignments >
      • Portraits
      • Perspective
      • Leading Lines
      • Textures
      • Foreground & Background
      • Repetition
      • White Balance as a Filter
  • Links
  • Contact
  • New Page

Film Strip Collage Construction

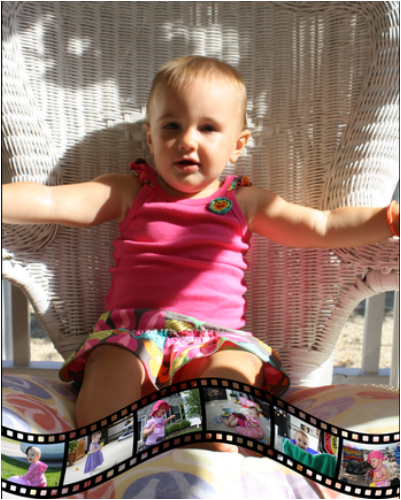
PictureMr. Tate's Film Strip Collage
The directions for the project can be found here. The one thing that the packet doesn't tell you is that you will need to make all of your pictures that same aspect ratio and orientation before you can use them to make an effective collage! See the Cropping page. Remember to take your time. 

Selecting Photos & Setting Aspect Ratio

For this project to look realistic, all of the photos have to be the same aspect ratio and orientation. You can absolutely choose photos of various aspect ratios and orientation, they'll just need to be cropped so they are all the same. The video below will explain how to do this.

Creating a String of Photos (Steps 1-4)

This video will explain how to do the first four steps in the process. Before doing this make sure that all of your photos are the same orientation and aspect ratio and that they are in a folder together! 

Prepping the Background Image (Step 5)

If your not too sure how to set the background image up for the correct size, aspect ratio & resolution the video below.

Building the Film (Steps 6-10)

Some people struggle on this part of the project. After all, it is just about the hardest one that we will do! Most people get stuck making the sprockets so I have made a really short video to demonstrate steps 6 through the start of step 10. These are usually the most difficult, so hopefully the video will help to clarify things.

Adding a Wave & Saving (Steps 11-12)

The last 2 steps are probably the easiest things to do. Choosing settings to make the wave look good without distorting the photos can be a little tricky though. The settings that I used are shown here in the video below.
Powered by Create your own unique website with customizable templates.